Containment has failed! Run your scripts wherever you are on the internet.
Apr 23, 2024
by Matas Ubarevicius
In the last couple of weeks we've been discussing and experimenting with a new way to run and embed bitbybit scripts. The result of these experiments is a new tool called BITBYBIT-RUNNER.JS. You can now run your scripts on your own websites, blogs, webshops or third party coding sites.

Runner is on the loose. Run your scripts wherever you are on the internet
Background
In recent months, our community has expressed interest in running bitbybit visual programming scripts outside of the native bitbybit.dev editors. Many users are keen on developing 3D configurators for popular e-commerce platforms like Shopify, Woocommerce, and others.
Initially, these requests were sporadic, but over time, a clear pattern emerged. Users desired the ability to execute their scripts on their own websites, blogs, webshops, or third-party coding platforms. Through discussions on our Discord channels and some dedicated brainstorming sessions, the concept of BITBYBIT-RUNNER.JS was conceived.
Challenges
While we've open-sourced much of our codebase and provided npm packages, setting them up isn't straightforward. Users need to integrate these packages into their development stacks, often requiring TypeScript coding for professional-grade applications. Moreover, executing scripts generated from our visual programming editors was simply not possible.
The Solution - BITBYBIT-RUNNER.JS
The objective was to simplify this process and offer a seamless solution. The idea was straightforward: create a tool that enables users to run their scripts anywhere on the internet. Crucially, the tool needed to be headless, meaning it wouldn't be tied to any specific UI library. This flexibility is essential because various website platforms (e.g., Wordpress, Shopify, Wix) operate on diverse UI systems.
Key Features
- Platform Agnostic
- BITBYBIT-RUNNER.JS is designed to function across various website platforms, ensuring compatibility regardless of the underlying UI system.
- Seamless Integration
- Users can seamlessly incorporate their visual programming scripts into their websites, blogs, or webshops without the need for complex setup procedures. The tool should automatically load webassembly libraries, instantiate webworkers, physics engines and all the resources needed.
- Single File
- Website gets all open-source features of bitbybit.dev platform from a single JS file that is hosted on a fast and reliable CDN.
- Interactivity
- Users can execute and interact with visual programming scripts generated on the bitbybit.dev website. This enables dynamic functionalities such as updating 3D models based on user interactions (e.g., selecting options on a Shopify site).
- Availability For Third-Party Coding Sites
- Currently many great coding sites exist, such as Stackblitz, CodePen, JsFiddle and others. BITBYBIT-RUNNER.JS can be used on these sites to run your scripts.
How to export scripts from bitbybit.dev
You can export your scripts created on bitbybit.dev website and execute them in the runner. All editors contain new button under the "More" menu called "Export to Runner". This button is shown in the picture below.
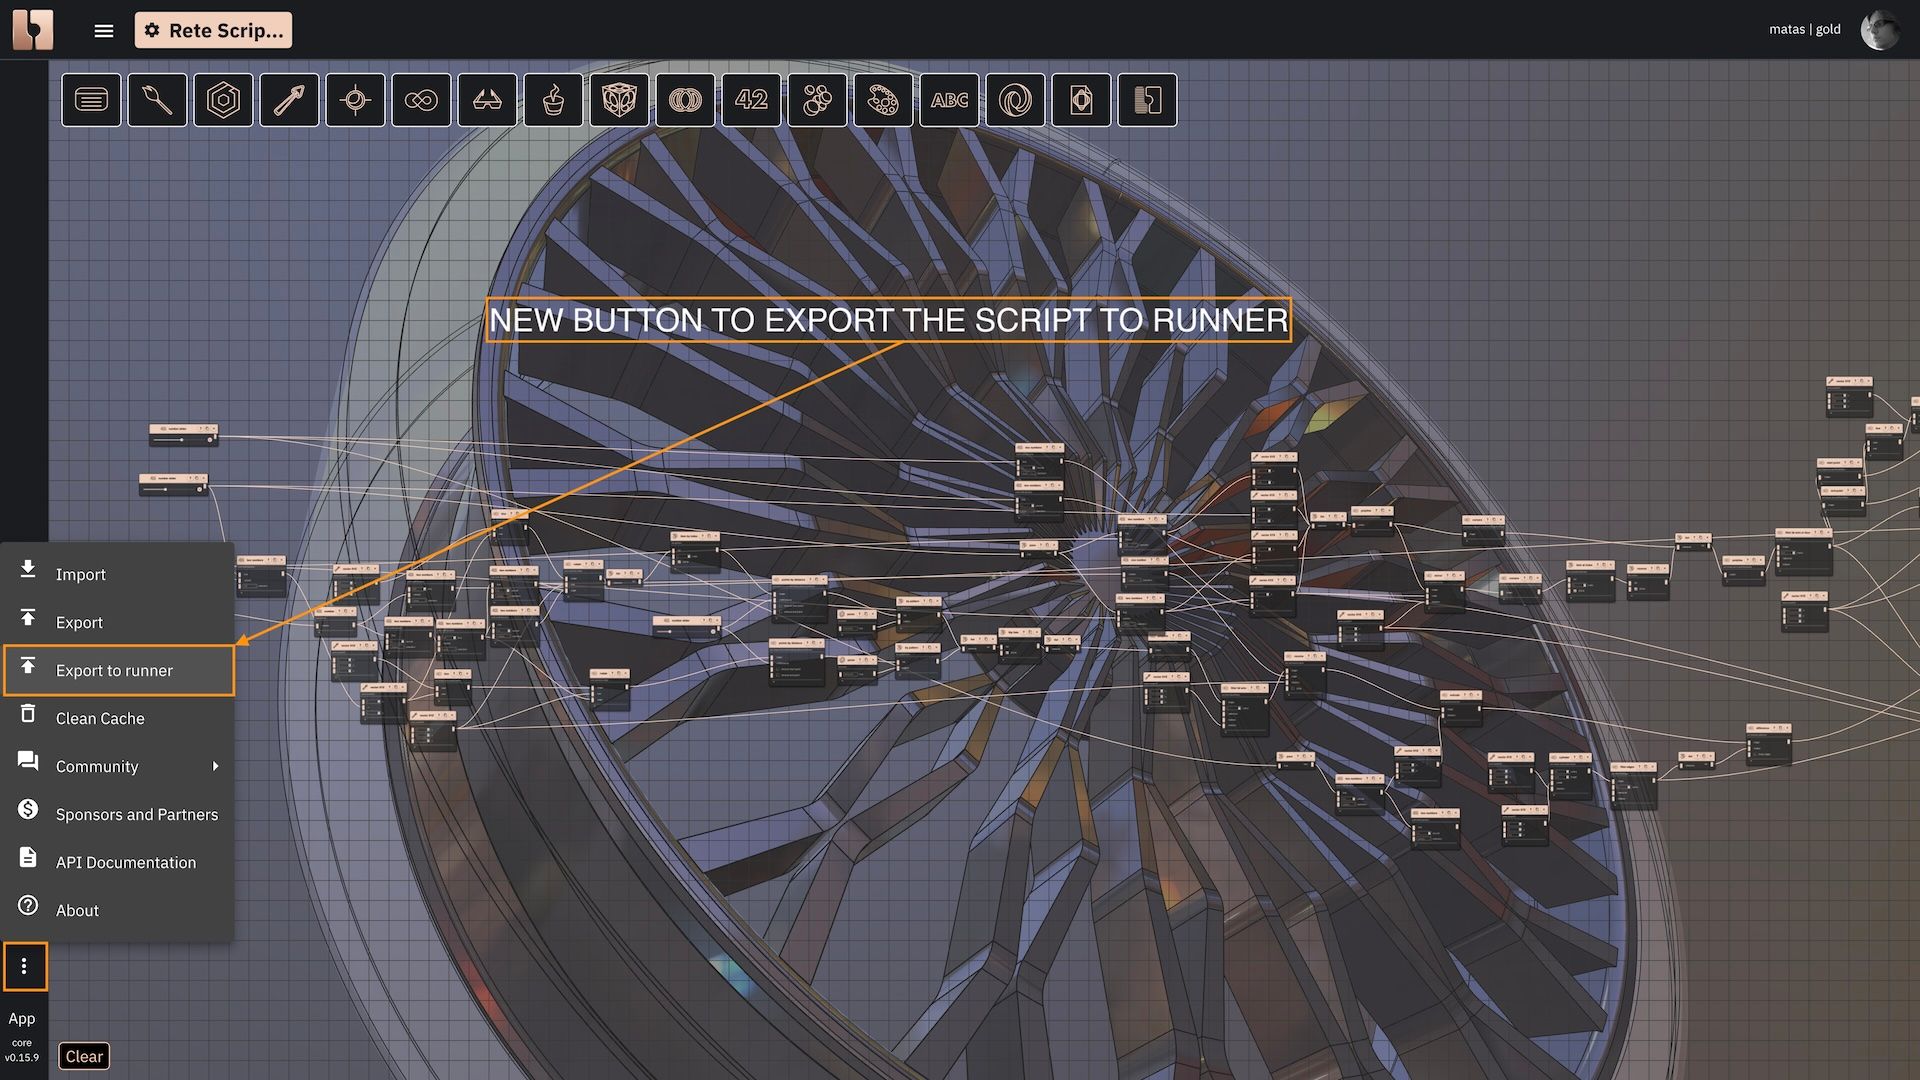
Button to export script to the runner. It is available for all editors - Rete, Blockly and TypeScript
When you click this button, a dialog opens up, displaying the generated JavaScript contents. You can then choose to save it as a file or copy its contents and paste them directly into your website.
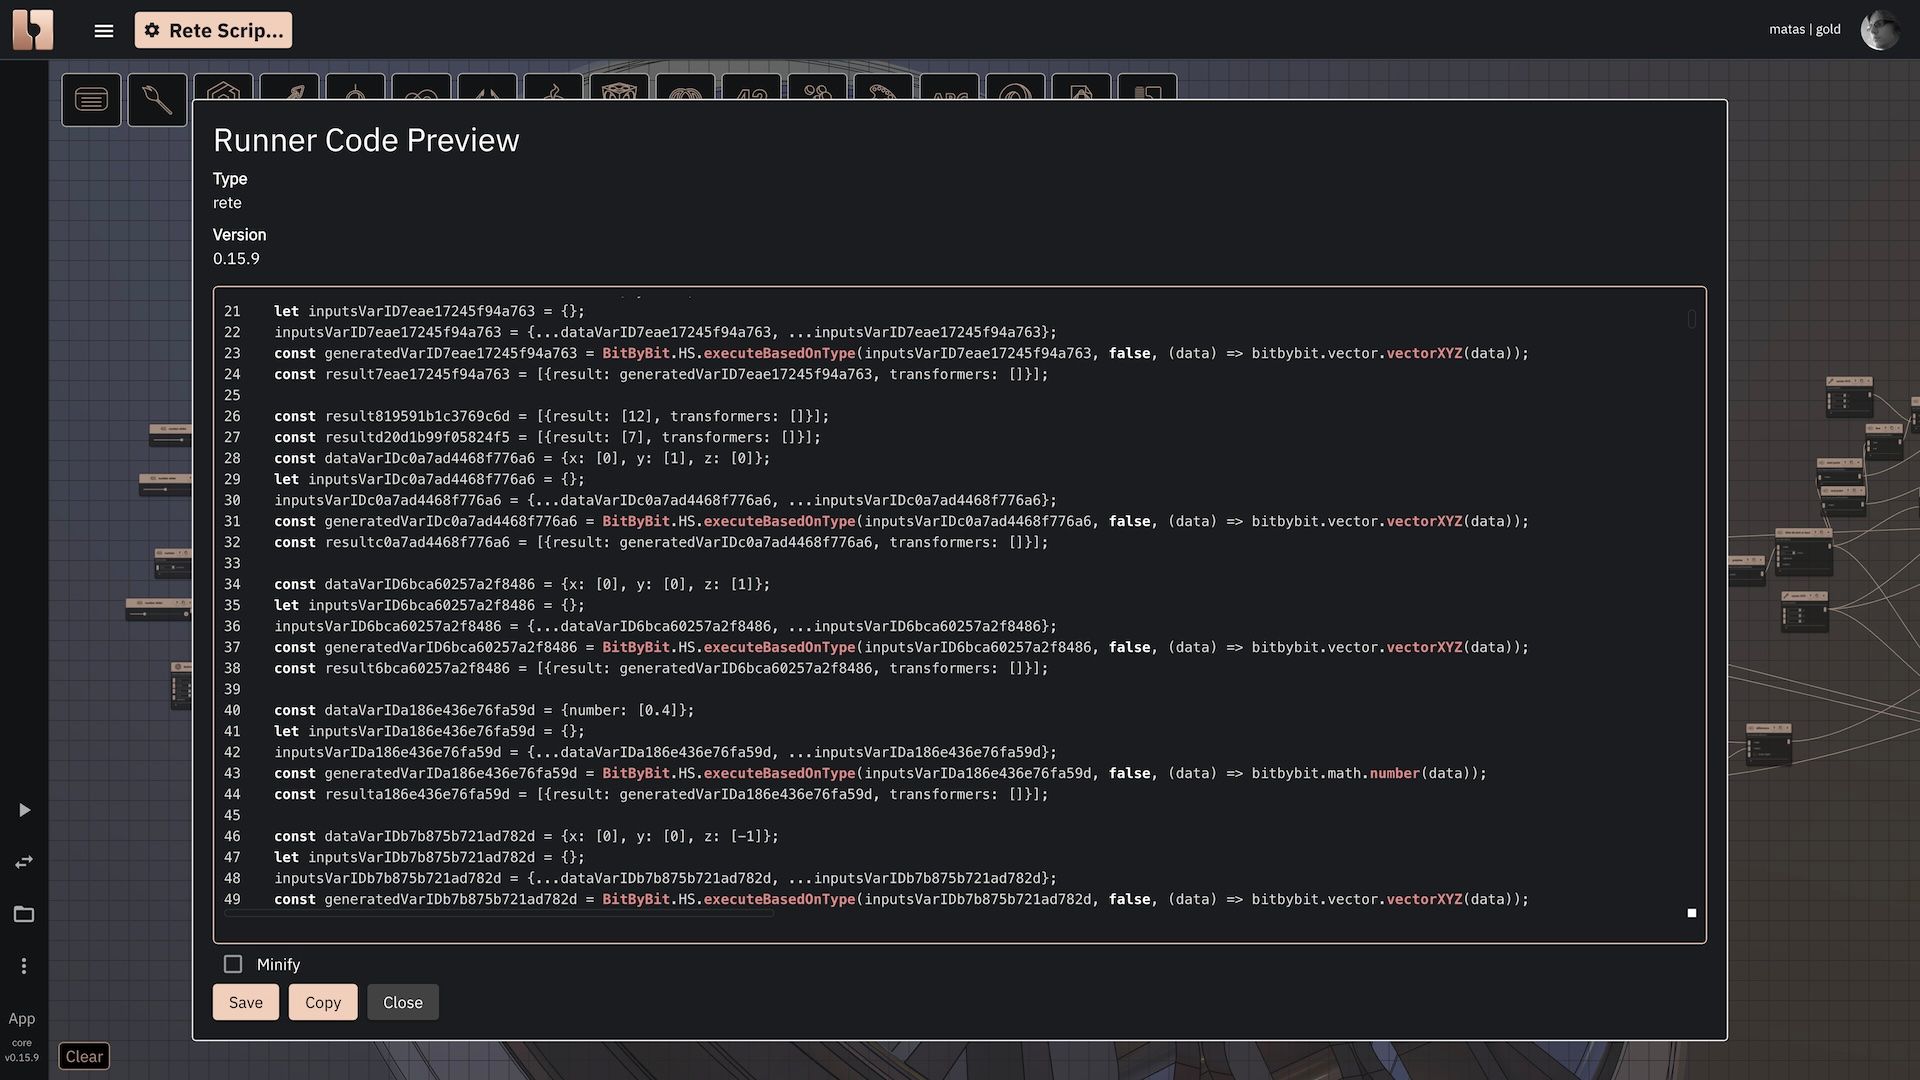
Dialog that shows prepared code for the runner
Examples of three different kinds of apps
We've developed and launched three different apps to demonstrate a few scenarios of how the runner can be used. More detailed documentation and tutorials will be available in the future.
Just run the Rete script
When you only need to run your script created in bitbybit.dev, you can follow this example. There are several ways to load the file into your website, but perhaps the simplest is to just copy and paste it and assign it to a variable or return it from a function. We've provided this example on three external coding sites: JSFiddle, CodePen, and StackBlitz.
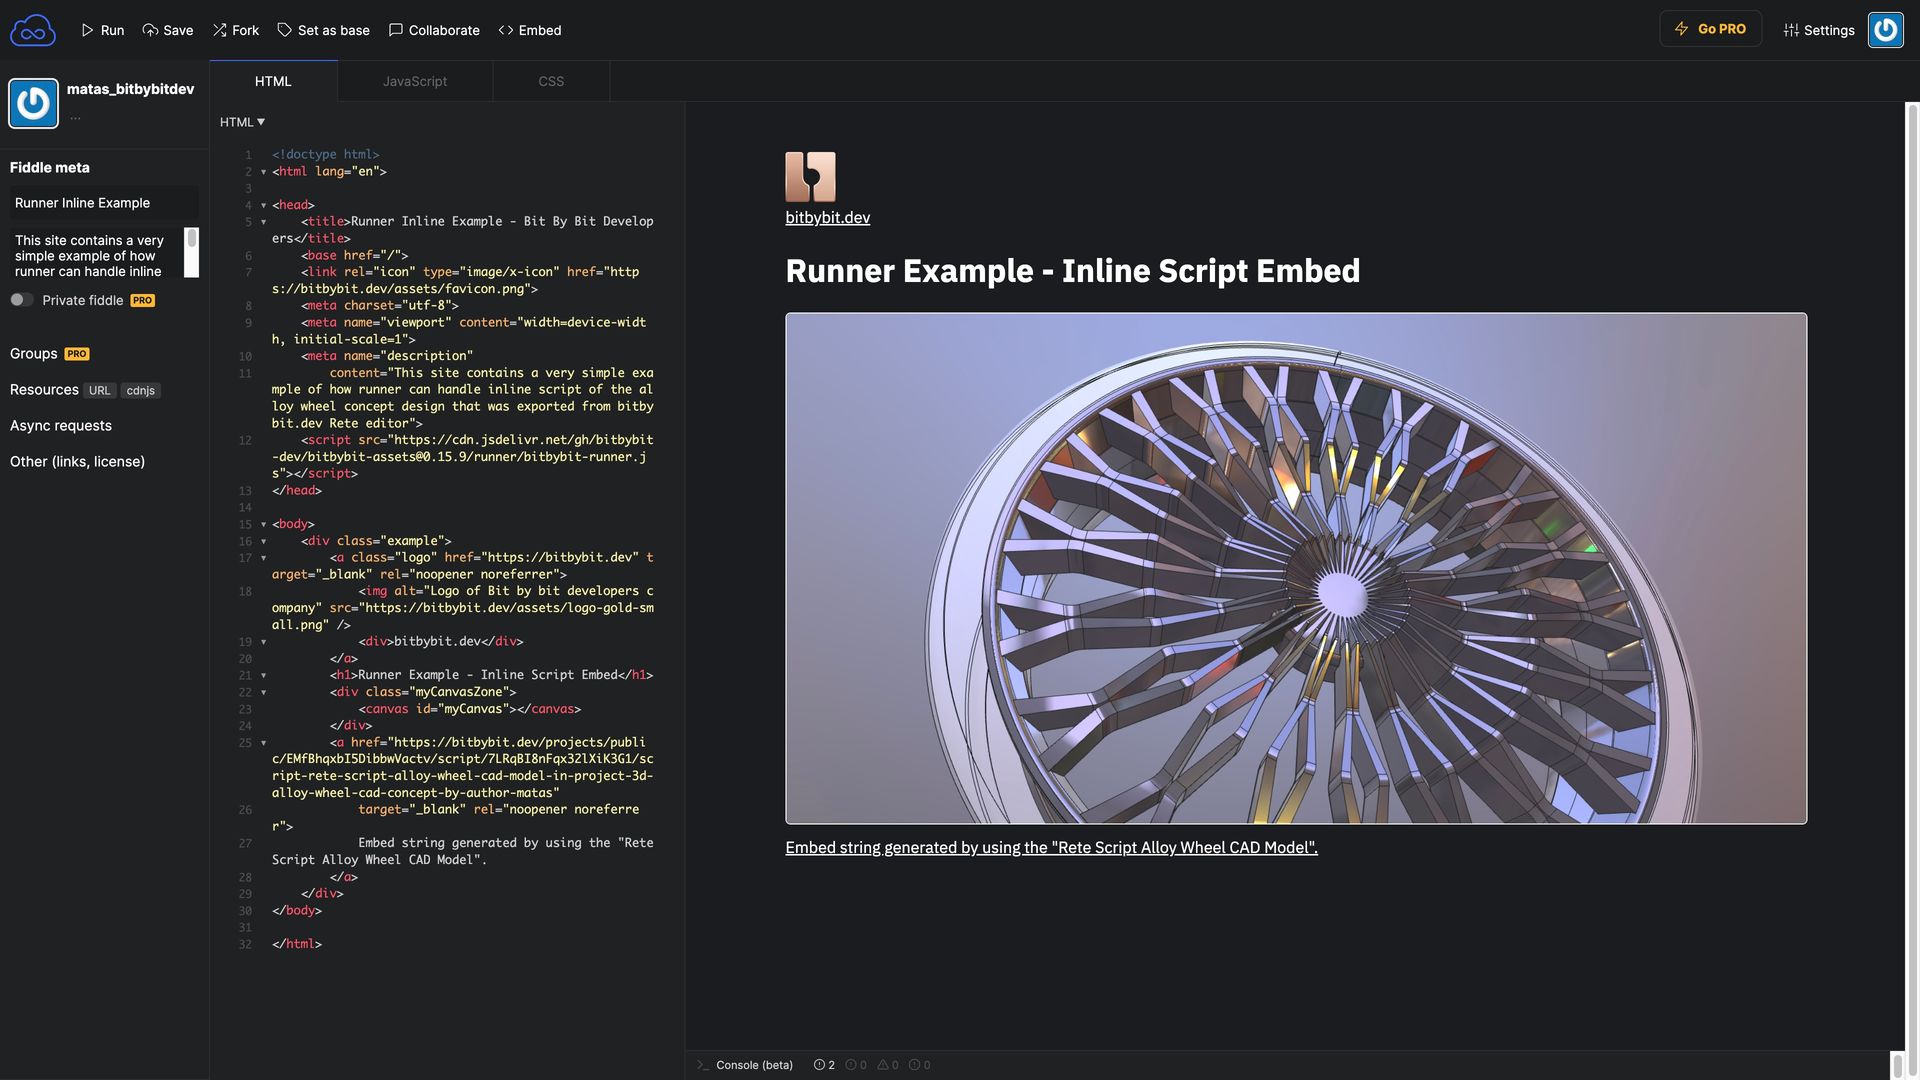
Alloy wheel CAD 3D model design on JSFiddle
You'll probably notice that the code on all of these websites produces exactly the same result. All of these examples were generated by following the Rete script available here:
What we did was copy the generated JavaScript code from the dialog shown in the picture above and returned it from the function called "exportedScript" in the script.js file. The code speaks for itself; feel free to navigate through the HTML and CSS to see how this example is set up.
Code bitbybit directly
If you prefer not to import scripts from the Rete, Blockly, or Monaco editors, you can code directly using the runner. This example demonstrates how it can be done. You'll see the code that creates a complete physics simulation of rolling balls through a slide. Once more, we offer examples on three coding sites.
Don't forget to click "Run Simulation!" button.
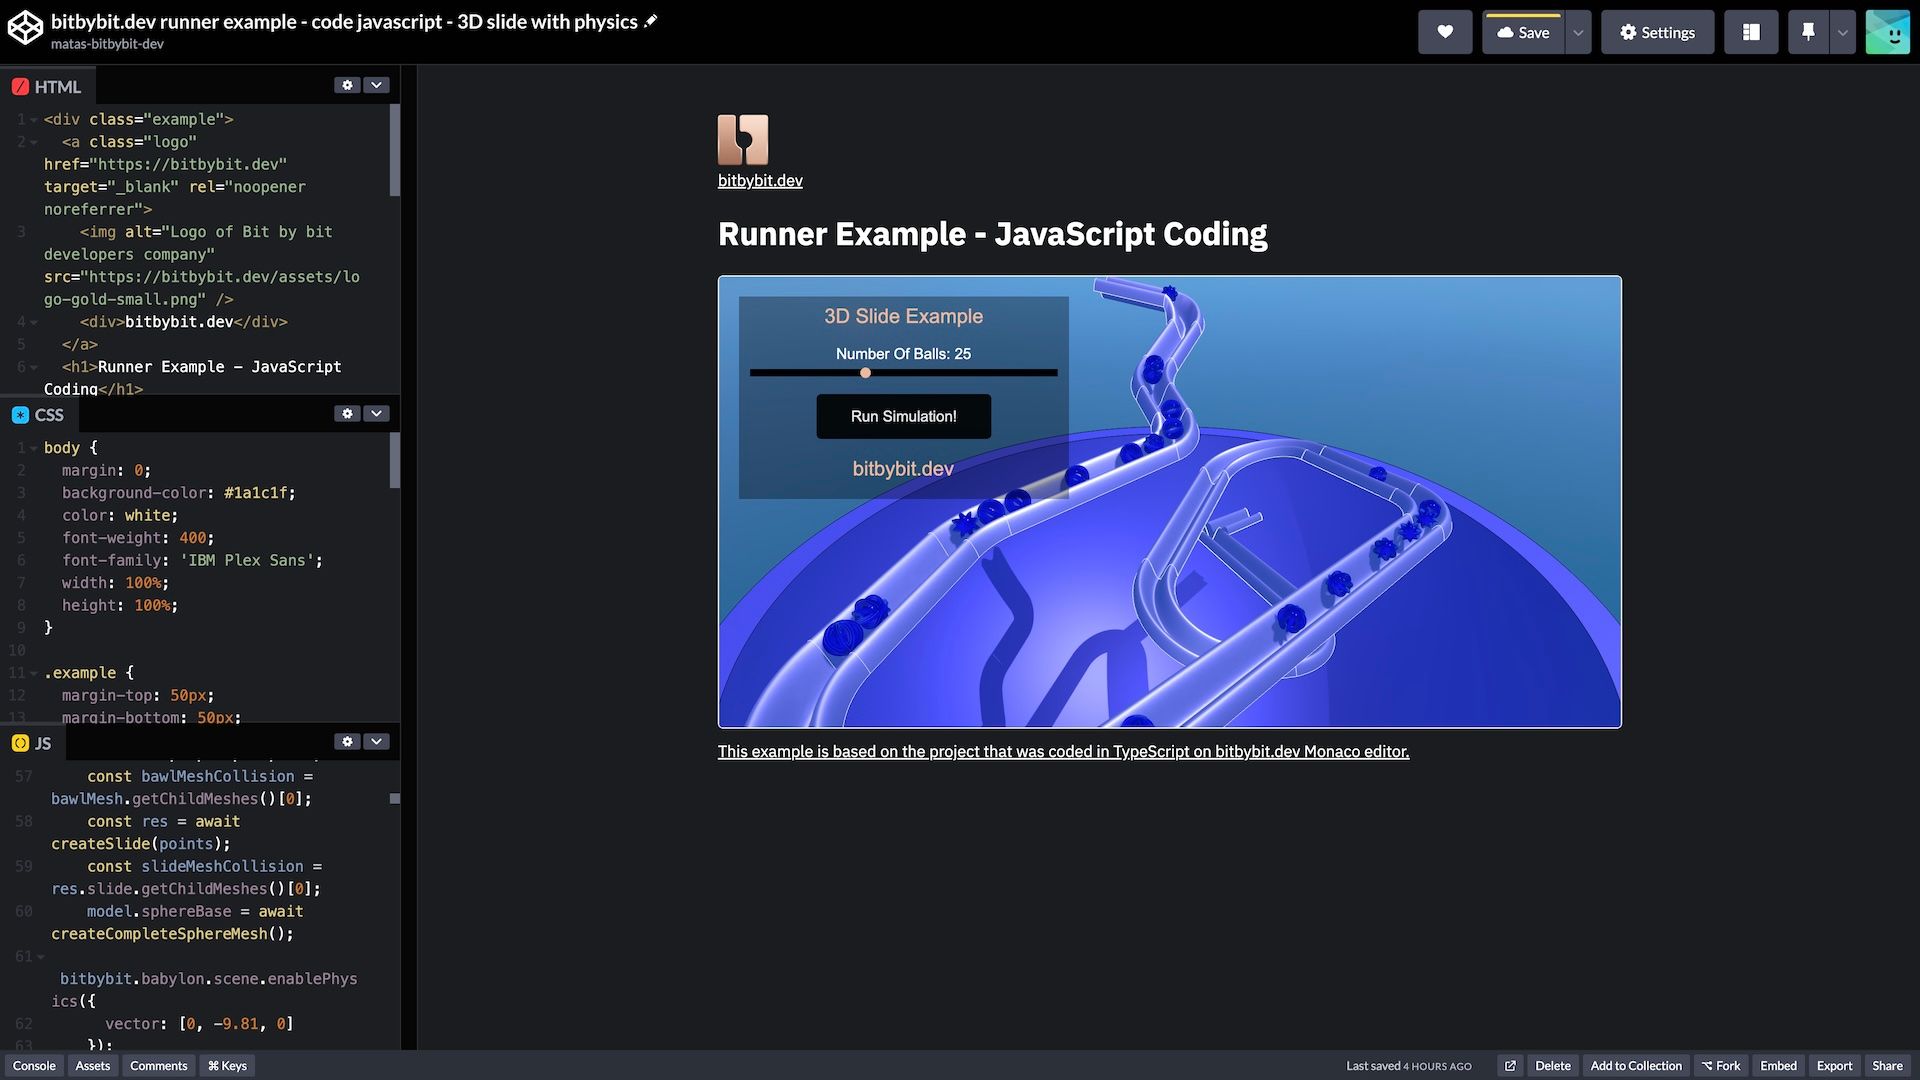
3D slide with Havok physics simulation on CodePen
This code was originally created in our Monaco editor. Then, we converted it to JavaScript through the export dialog and copied it into these editors.
Interact with Rete script through custom UI buttons
In most cases, users will build some form of 2D UI around the 3D canvas scene. 3D CAD configurators typically involve selecting criteria that define models and then constructing geometry based on various constraints related to those inputs. Configurators can range from simple to complex, depending on the use case. While this example is basic, it includes all the essential elements of a 3D configurator. We use CSS to style our website, buttons, include a custom logo, and set up the runner. This example demonstrates how you can provide inputs to your script exported from Rete and read the outputs of this script.
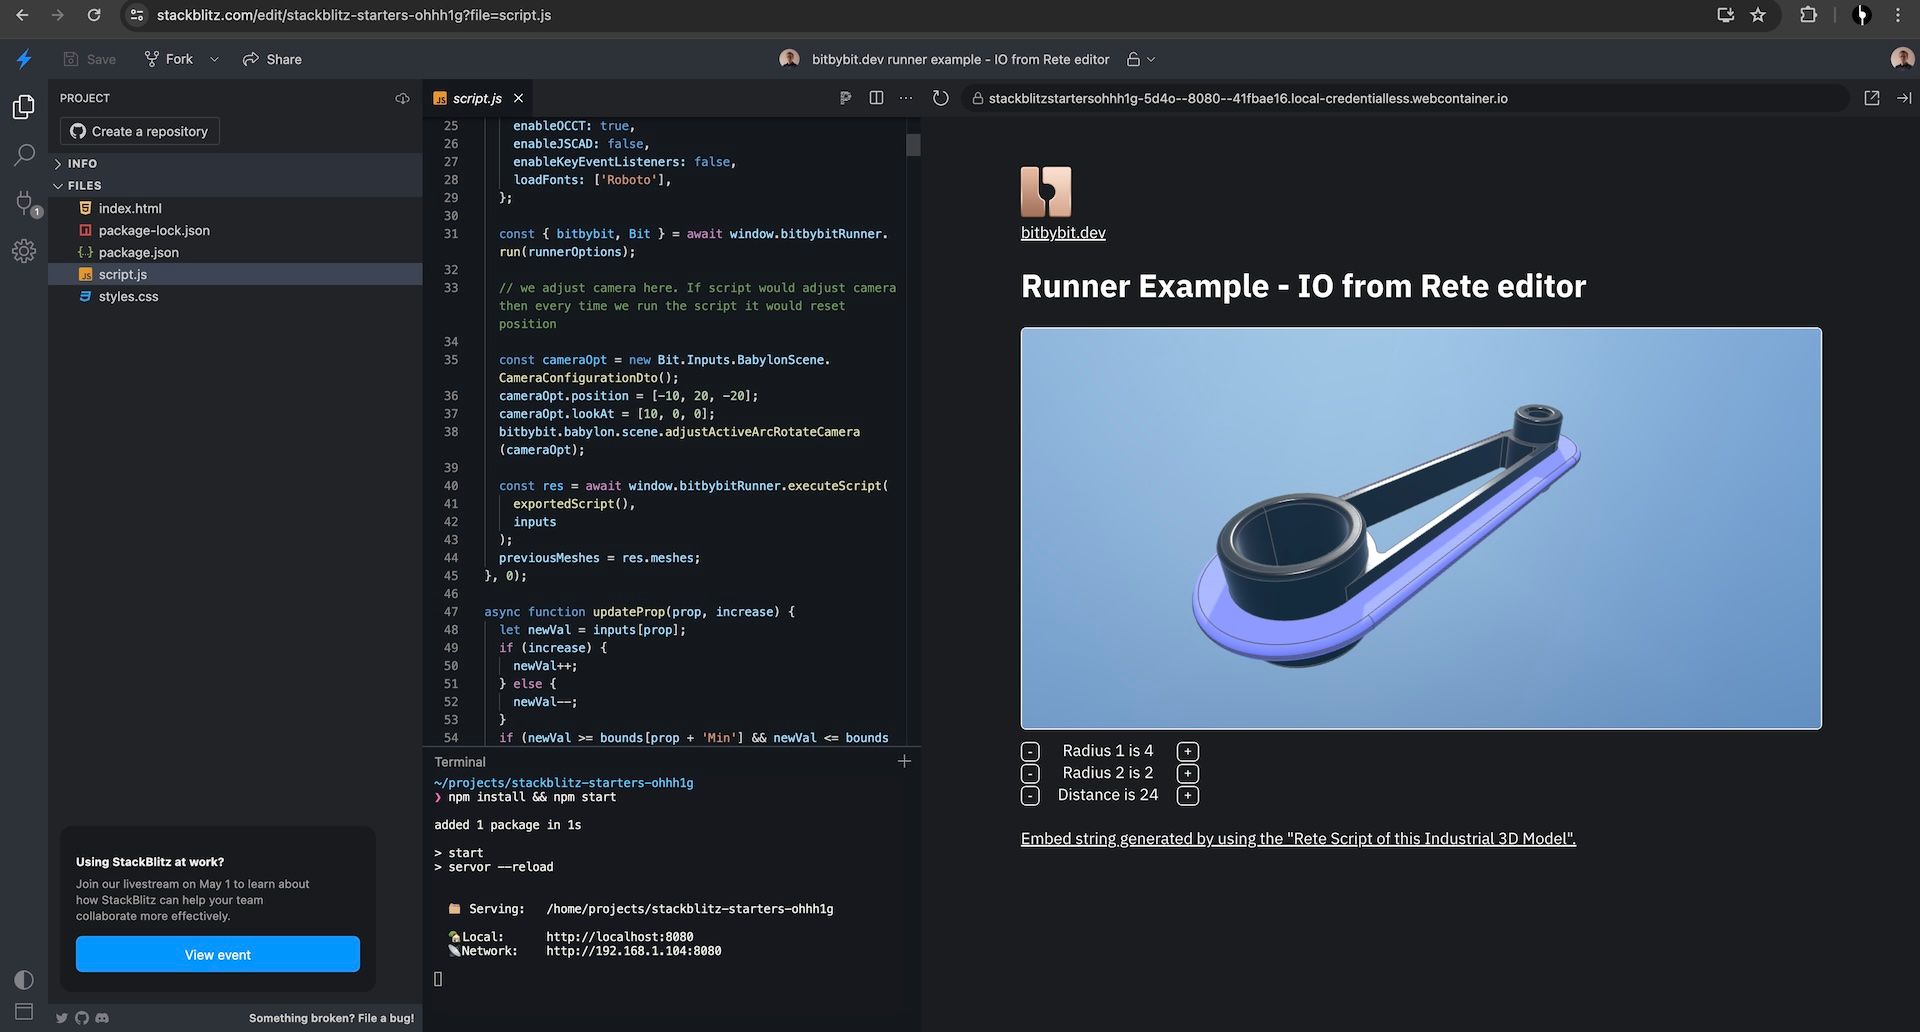
Simple 3D model configurator on StackBlitz that interacts with Rete script
The + and - buttons adjust the values of the script inputs. The script reads these values and updates the 3D model accordingly. We also read the two meshes as outputs from this script so that we can dispose of them when the next result is generated. The script used in this example is available here:
How to prepare scripts for reading inputs and writing outputs
In the Blockly, Rete, and Monaco editors, there are new functions for communicating with the runner. Here, we'll only explain how to do it in the Rete editor. In the example below, you can see components that read inputs and write outputs. The components that receive input values are visible but return undefined values while used in the editor. However, the runner will fill these values correctly and ignore the values produced by number sliders in its own context. This means that users preparing scripts for the runner should do so proactively. The runner only knows how to execute JavaScript; there's no Rete runtime or UI available to the runner, so you can't overwrite the behavior of components in the runner. Treat the exported script as a static code snippet. Due to this architecture, there's a good chance that the runner will execute your script slightly faster and more efficiently than the editor. It won't be concerned with various UI logic surrounding the scripts.
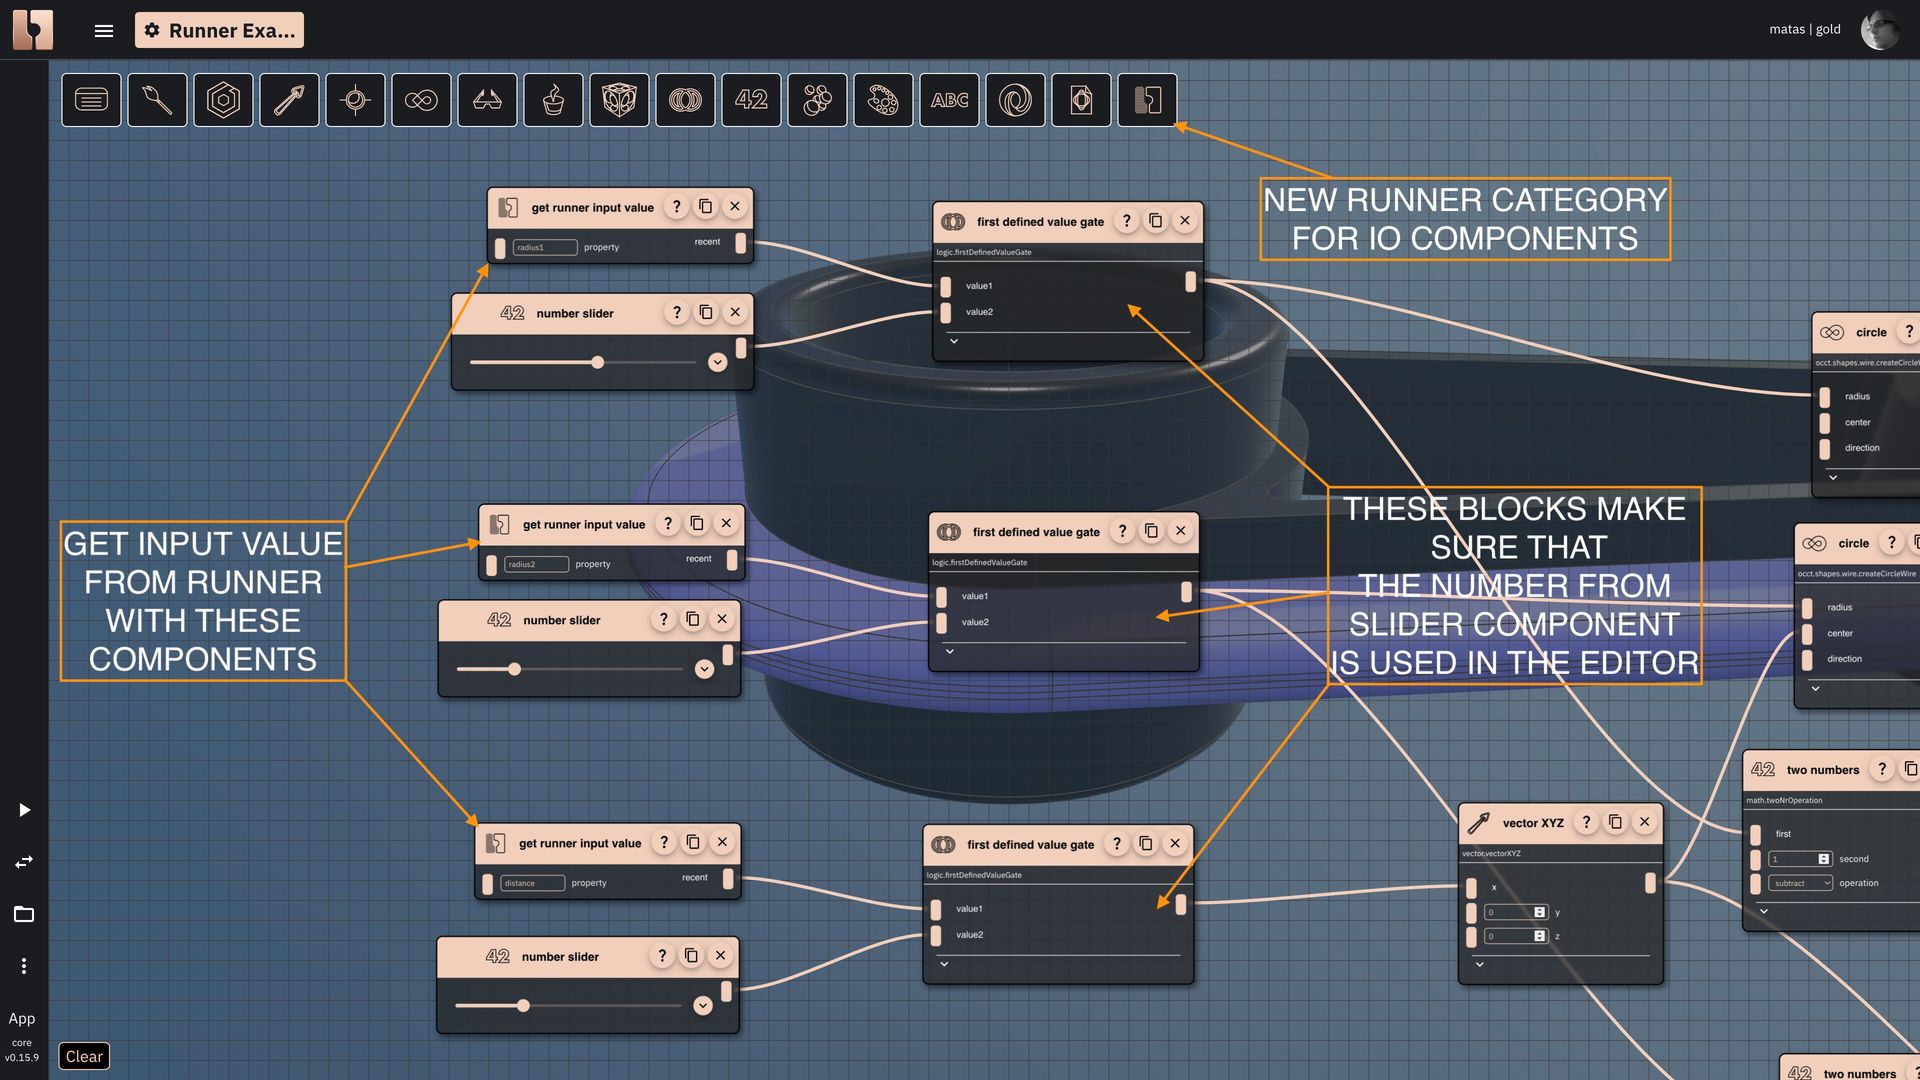
Rete editor components that read the inputs of the runner when executed in the runner
Having said that, you can assign any kind of value to any component through these inputs. If you'd like to change the color of the background, send the hex color string. If you want the 3D text to have a different word output, send the string value as input. You can even execute two scripts and send the output of one script to the input of the next one. This way you can create a chain of scripts that execute one after another and have parametric relationships with each other. The possibilities are endless.
Rete editor components that read the inputs of the runner when executed in the runner
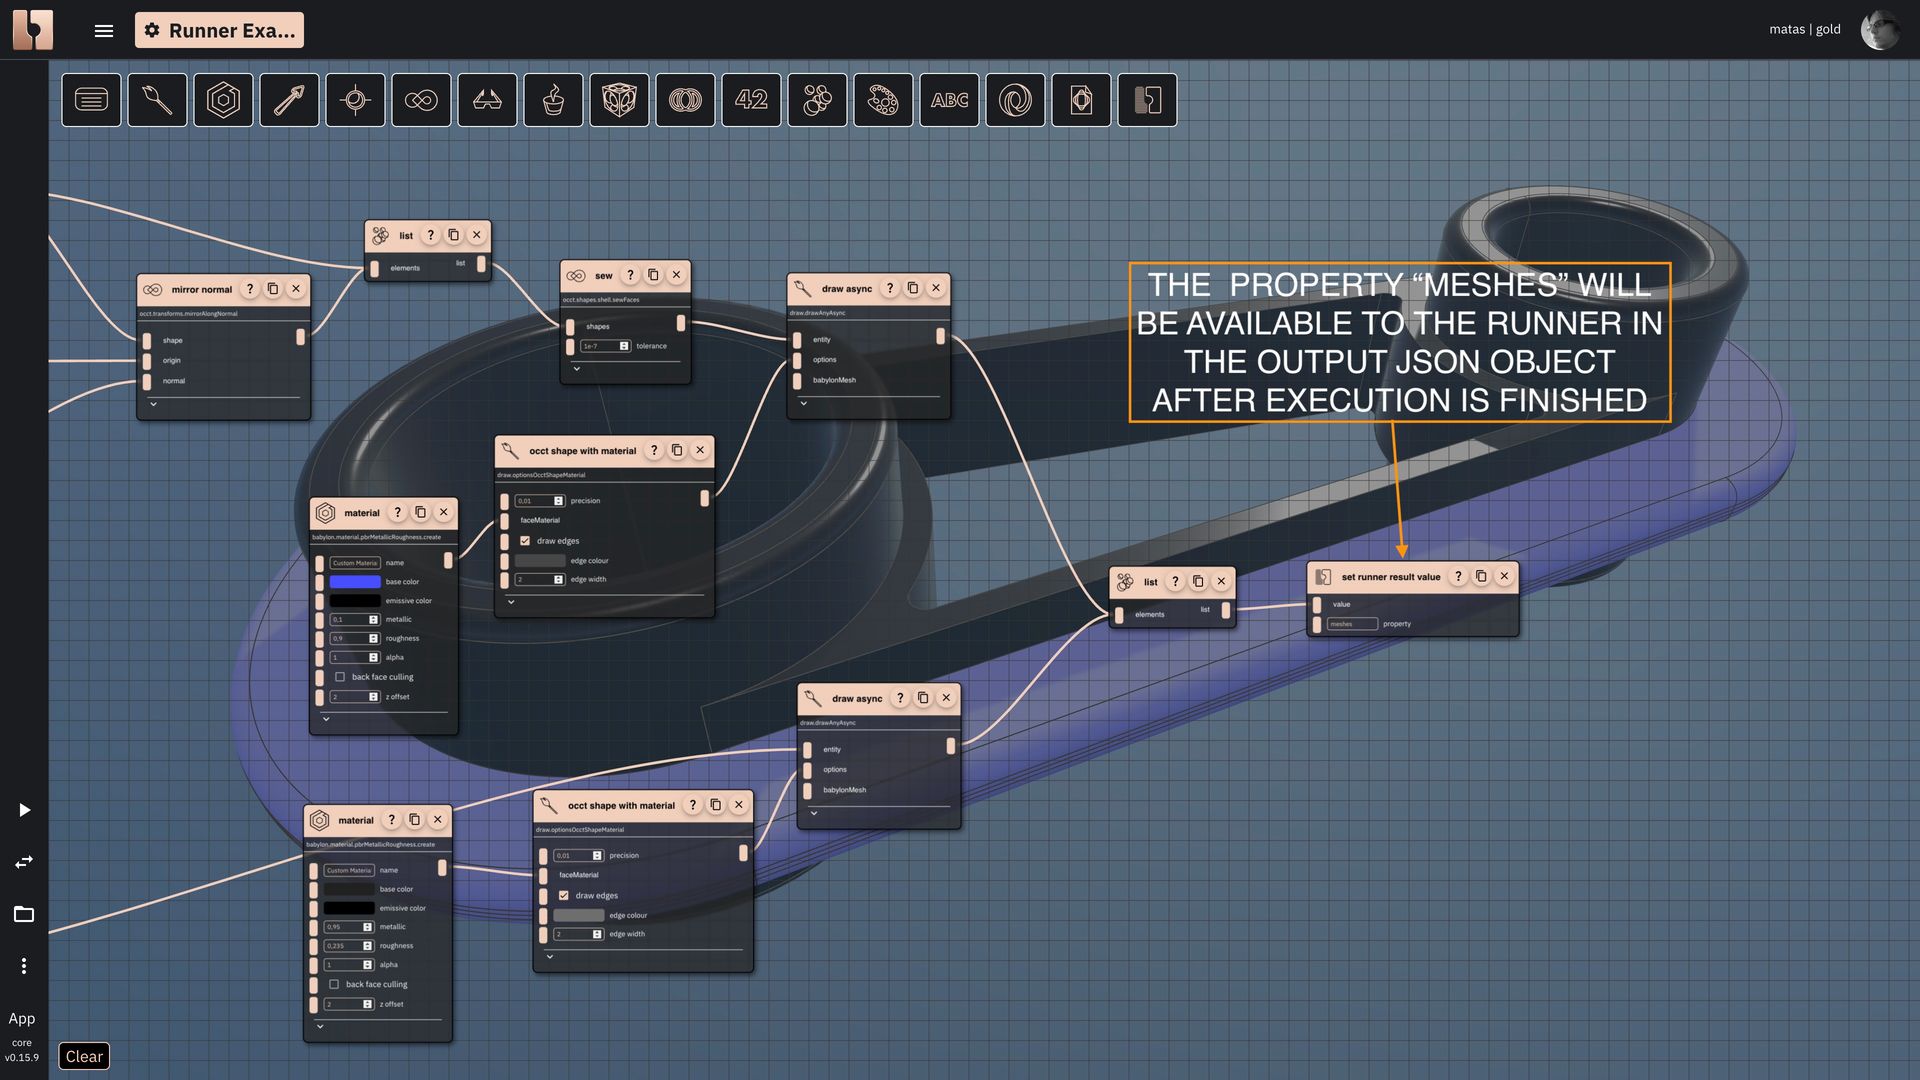
Outputs play a crucial role in the runner's functionality. With bitbybit.dev editor scripts, you can generate a variety of outputs, such as numbers, texts, meshes, or OCCT hashed objects. Depending on your specific needs, you might opt to output an OCCT pointer to the shape, which can then be rendered in the runner's code.
Given that the runner executes scripts directly in the browser, there isn't a significant performance difference between drawing objects in scripts and drawing them in your runner's code. However, your choice between the two methods may be influenced by specific application requirements.
Consider scenarios where you need to dispose of meshes, reset cache, and so on. For example, you might want to run a script to collect multiple meshes and display various variants to the user. Alternatively, you may simply need to display the latest output of your script.
Each of these scenarios necessitates different setups for both the runner and the visual script in bitbybit.dev.
Soon, we'll provide more examples of how to set up your code on bitbybit.dev to read and write outputs in other editors. Stay tuned for updates!
How to load the library
While the process is straightforward, there are still some steps required to enable your website to run bitbybit.dev 3D algorithms. First, you must include the BITBYBIT-RUNNER.JS script on your website. This script will automatically load all the necessary resources and instantiate the web workers and physics engines. Once that's done, you can run your scripts and interact with them.
The JavaScript file is hosted on jsdelivr CDN and can be included on your website by using this script tag:
<script src="https://cdn.jsdelivr.net/gh/bitbybit-dev/bitbybit-assets@0.20.4/runner/bitbybit-runner-babylonjs.js"></script>
Keep in mind that the version number will change when new releases are made available. By including this script, you'll be able to access the functionality of the runner by using the window.bitbybitRunner object.
Functions of window.bitbybitRunner
Below, we'll explain in simple terms the functions currently available. For practical examples, please refer to the scripts that were provided above.
- run
- This async function will initialize the runner. Wait for it to finish before executing scripts. You must provide it with the ID of your canvas HTML element. It will create and configure a default BABYLONJS scene, instantiate all the CAD kernels, load WebAssembly libraries, fonts, instantiate the Havok physics engine, and other resources needed for the scripts to run. By default, the run command will instantiate everything, which may be more than what you need. Through the options object, you can disable various features.
- executeScript
- This function will take a script that is exported from the bitbybit.dev editors and execute it. You can also pass an inputs object to this method. If your visual script includes special components that read the inputs, they will be used in the execution of your script. It will also return the resulting values collected from the script during its execution.
- cleanOCCTCache and cleanJSCADCache
- To ensure that your scripts run quickly, the OCCT and JSCAD layers of the application cache 3D models that are created. If you want to clear this cache, you can call this function. It will flush all of the cache.
What's next?
We're thrilled about the potential that the BITBYBIT-RUNNER.JS library brings to the platform. There are many new possible directions this can take, and we'll share more information about them later. This runner release is experimental, and there may be things we haven't thought about yet, so keep that in mind when using it. Also, please do let us know how you would use the runner and inform us if something doesn't work as you would expect. This is the first release of the runner, and we plan on improving it and testing it further. There are documentation pages that still need to be written, and we also plan to release a YouTube course on how to use the runner to the public. In the meantime, we also plan to experiment with backend code execution, but for now, let's leave that for another day. Cheers!